
"None of us is as smart as all of us." -- Ken Blanchard
Collaboration in NVivo 11 Pro for Windows revolves around the idea of merging individual projects into a ‘master project’.
How does this work?
A team leader creates a ‘master project’ and distributes copies to the team. Team members work in their individual copies of the project – coding, annotating, creating memos and so on.
At regular intervals, the team leader merges the copies back into the master project.
Where there are duplicates, the team leader can choose to merge them. For example, if two researchers have coded the same transcript, the team leader can choose to merge the coding.
But how do you create this ‘master project’ and what elements should it include?
This post takes a closer look at NVivo master projects and suggests ideas for setting them up.
Create the Master Project
A master project starts out like any other NVivo project. You create it by choosing Blank Project from the Welcome Screen or New from the File menu.
When you’re prompted to name the project, you can identify it as a ‘master project’ and include a description - this can help to orientate team members.
Once you’ve created the master project, you can prepare it for teamwork.
This is a good opportunity to take a step back and consider your strategy for:
- Distributing the work among team members
- Ensuring coding consistency
- Tracking team progress
Don’t rush through the setup – take time to think about what each team member will need to successfully contribute to the project.
You may want to brainstorm ideas with the team, which you could do with a mind map in NVivo.
Import and organize source materials
After creating the master project, you can import the source data that the team will be analyzing.
If team members are working on separate sources you may want to create a folder for each team member and import the allocated source materials into it - for example, Effie is responsible for coding the first four interviews:
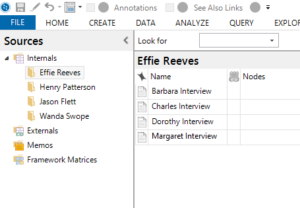
Create a folder for each team member
If multiple team members are coding the same sources or you expect there will be overlap, you may prefer to organize your material by type (interviews, journal articles, videos and so on) and use sets as way of gathering materials for each team member.
For example, this set for Effie Reeves contains shortcuts to the materials she’ll be working on:
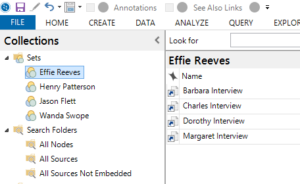
Use sets to gather materials for each team member
Use memos to capture progress and guide researchers
You can create memos in the master project to support the members of your team.
For example, you might want to create a project journal for each team member and encourage them to use it for capturing insights, reporting problems and recording progress.
This type of memo-journal prompts researchers to be more reflexive as well as providing a great audit trail of the work that’s been done.
The memos you create in the master project can also help team members to stay on track. They might include:
- An outline of the research question and project goals
- Contact details for each team member and a break-down of the allocated tasks
- Schedules and timelines
- Mind maps and other material captured during early brainstorming sessions
Setup the node hierarchy
Team projects often require researchers to analyse data against a tightly controlled coding framework (or node hierarchy, as it’s called in NVivo).
By setting up a node hierarchy in the master project, you can be sure that each team member is coding against the same set of nodes.
You might develop this node hierarchy based on the results of a literature review or on preliminary analysis of the data.
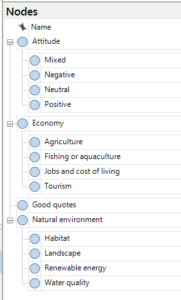
Coding framework in the master project
The flexibility of the node structure depends on your research methodology but if a coder wants to create a new node, it is good practice to discuss it with the team or store it in a separate node folder.
To make sure your team members understand the protocols for coding at nodes, you could run a ‘pilot coding session’ where each researcher is given the same transcript and asked to code it at the nodes in the hierarchy.
Then, you could run a Coding Comparison query in NVivo to check the consistency of coding and levels of agreement. Use the results to promote productive debate and to get team members on the same page.
Coding consistency is often called inter-rater reliability and, for many projects, it’s an important indicator of analytical rigour.
As you create nodes for the master project, remember to include a description in the node properties – this will help coders make well informed coding decisions.
Include a codebook
A codebook is an essential part of any team project.
It describes each node in the hierarchy and explains how it should be used – this also helps team members to take a consistent approach to coding.
In NVivo, you can generate a codebook based on the descriptions you define in node properties.
Import this codebook as a memo in your master project – so that team members can refer to it as they work through the source materials.
Make copies and distribute the project
Once your master project is in good shape, you can copy the project file and distribute it to the members of your team – you could do this via USB or file sharing sites like Dropbox.
Each team member can then open their own copy of the project in NVivo.
When they first launch NVivo, team members are prompted to enter ‘User Profile’ details.
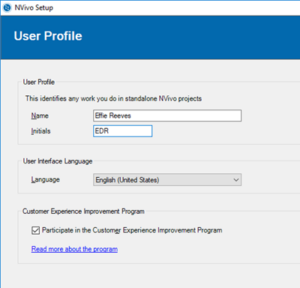
User profile in NVivo
The Name and Initials are important.
When you merge projects back into the master project, these initials help you to identify the work done by different researchers.
For the whole story, refer to How project user profiles are created in projects.
Once they’ve entered their names and initials, team members can roll up their sleeves and get to work in their own copies of the project - supported by the folders, memos and codebook you created for them.
Merge individual projects into the master project
It’s important to merge projects back into the master project on a regular basis. This helps you to confirm that your approach is working and that the project is headed in the right direction.
You may want to merge projects before each status meeting – and then use the updated master project as the basis for discussion.
To merge projects, you open the master project and choose Project from the Data tab and follow the prompts.
Refer to the online help for detailed instructions.
Once the individual projects are merged into the master project, you can use all sorts of tools to explore the work done by team members.
For example, you can display coding stripes to see who coded what:
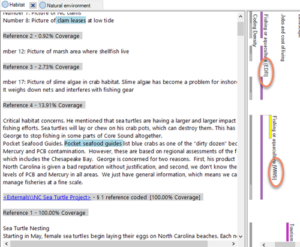
Coding stripes displaying the coder’s initials
Or create a chart to visualize the work done by team members.
This chart shows the percentage of coding at nodes done by users (1, 2 and 3) in a selected source:
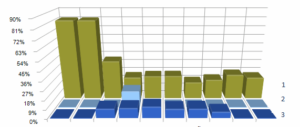
Chart showing coding done by team members
Consider working with NVivo for Teams
NVivo for Teams offers advanced support for collaborative analysis.
Team members can work in the same project at the same time and updates are handled seamlessly.
It might be worth considering if you’re working with large volumes of data and like the idea of real-time collaboration.
For more tips on a streamlined approach to teamwork, check out this post by Lyn Lavery (NVivo Certified Platinum Trainer).
If you have any tips or comments about using NVivo to support teamwork – we’re all ears!
ABOUT THE AUTHOR

Kath McNiff
Kath McNiff is on a mission to help researchers deliver robust, evidence-based results. If they’re drowning in a sea of data (or floods of tears) she wants to throw them an NVivo-shaped life raft. As an Online Community Manager at QSR, she knows that peers make the best teachers. So, through The NVivo Blog, Twitter and LinkedIn, she shares practical advice and connects researchers so they can help each other. When she’s not busy writing blog posts, swapping stories on social media or training the latest tribe of NVivo users, she can be found wrestling four feisty offspring for control of the remote.